Introduction
In all web projects, it is more than necessary to create a page map rather than jumping straight into designing them. Most websites contain a home page and several other pages. Creating a page map allows you to frame your project, to start thinking, to collaborate, to structure the information according to their contents, to create a homogeneity in the website.
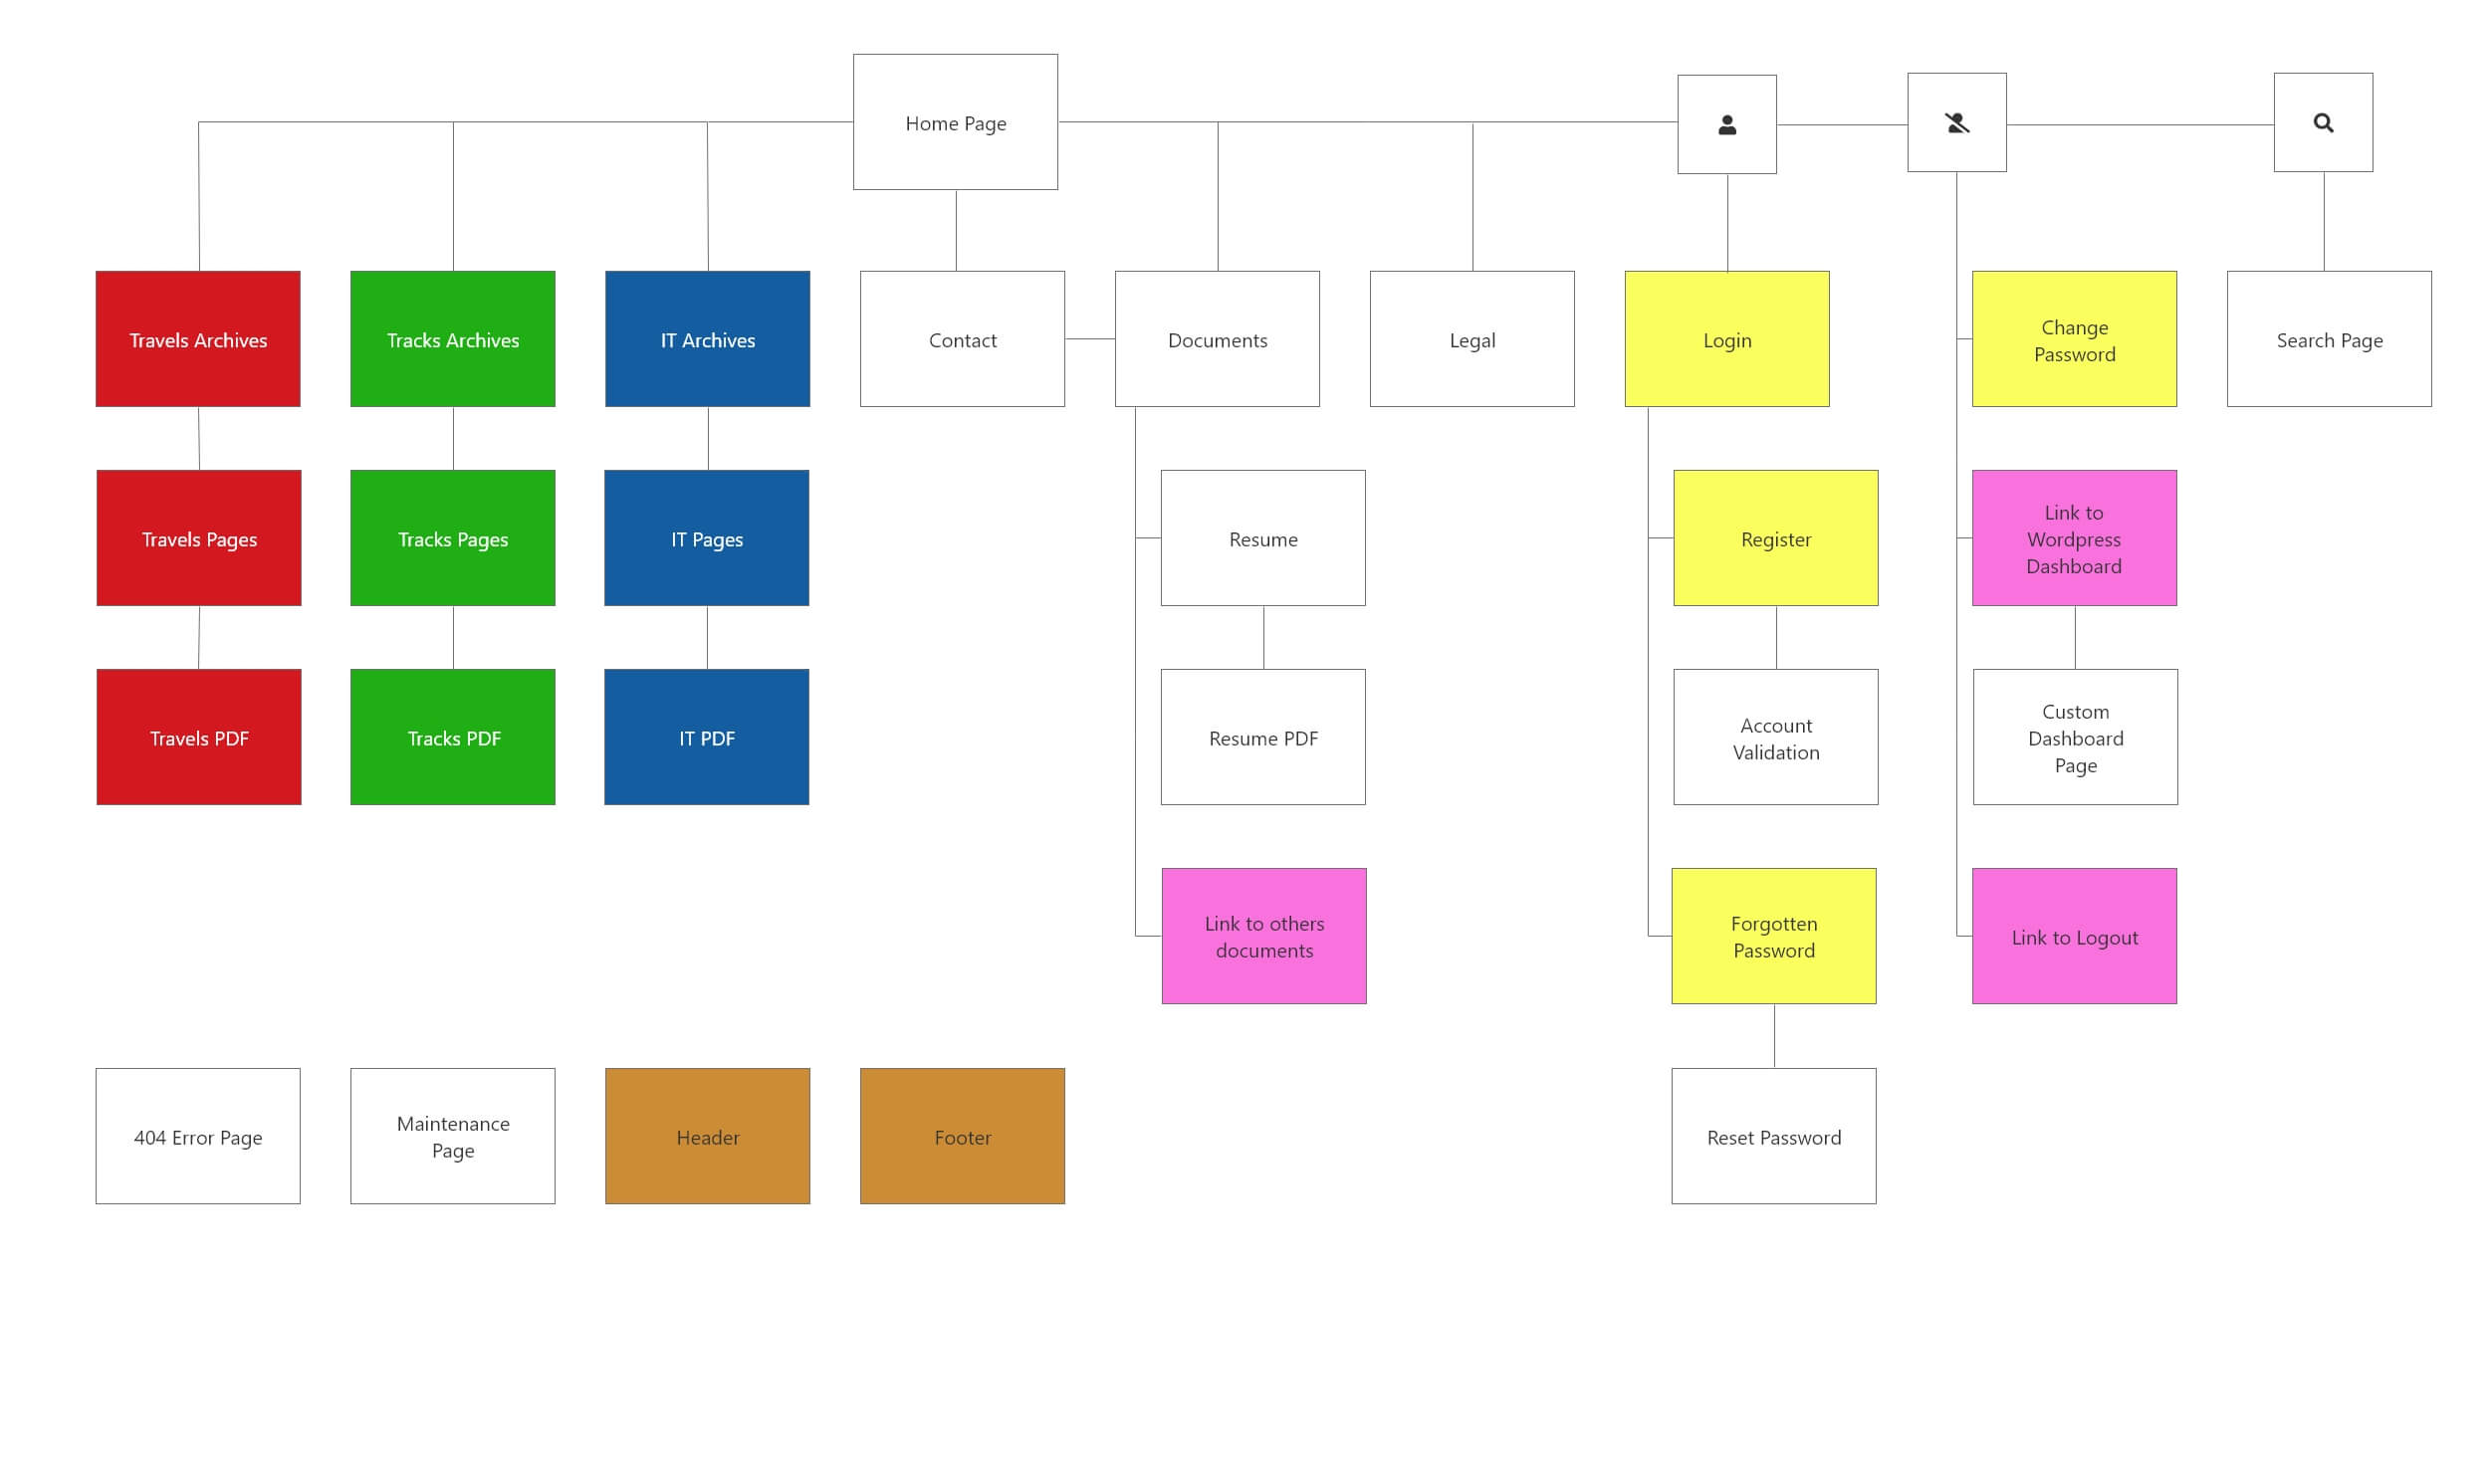
Below is the page layout as it was when this publication was written. At the beginning of this project, the plan was much simpler. It has grown with the knowledge of WordPress and especially Elementor acquired over time. The page builder allows you to create templates, popup windows, and special pages like the header and footer.
It is also possible to create several types of posts using the Custom Post Type (CPT UI) plugin or to create them manually. This allows you to add to the basic type of WordPress that are the posts, other types depending on the information you want to process. Another post will deal with the subject of custom types later, but it was necessary to mention it here to start the page plan with the most information possible.
The homepage
The first page of any website always starts with a home page. It is the one that corresponds to the name of your domain with or without the name of the latter. The home page is a place where the content of the site will be presented. It is often eye-catching to encourage the curiosity of the visitor. It is often made up of a banner called “Hero”, the last posts put online and other more or less interesting informations.
The GDPR (General Data Protection Regulation)
For some years now, every website has been required to display information about the privacy policy. Many sites display it in the form of a modal window, more annoying than really informative. This window must be closed manually to validate our agreement to the implementation of the famous cookies, which are nothing more than files that record your settings, collect them and, in some cases, analyze them to know your preferences. WordPress has prepared a legal text that you can use or not, depending on your needs.
In the case of Fuyens.ch, a privacy page, which is nothing else than the one provided by WordPress, has been added. No data is retrieved (email addresses or comments) for analysis. On another note, the subject of data protection is a sensitive one and it can be important to work on its legal text. It was quite important to mention this in the page layout.
Three types of publications
From the beginning of the project, the publication of my travel photos, as well as the sharing of my passion for cycling and my bike routes, which some took me far from home, were defined. It was quite clear that the need to post three different types of publications, my travels, my bike tracks and a third category on the computer to keep a record of all my thoughts and studies, were on the agenda. It’s the latter type that you are reading right now.
The archives
Elementor allows you to create archive pages on which posts of a certain type will be displayed. It is therefore planned to create one archive page per type.
- Red, the travels.
- Green, the bike tracks.
- Blue, the topics of my IT blog.
The single publication pages
Elementor displays the content of each post using a template called the single post. This template is used to read this content. It is also necessary to create a template for each type of post (red, green, blue).
The printable versions (PDF)
From the beginning of the project, this notion was relatively important. While looking for inspiration on other websites, it appeared that many of them did not provide a dedicated PDF output for printing. This option was hardly unfeasible and was simply added to the page map. Far from knowing that it would not be so simple and that the challenge was going to be huge.
The doubt about the validity of adding such an option is understandable, when a website is mostly consulted digitally, and not in the form of a paper output.
One thing to know before deciding whether or not to add printing functionality, WordPress is not designed for this and external libraries will be needed to achieve this. As for archives and single publications, three templates will be needed for PDFs.
The contact page
It is a good idea to give visitors the possibility to keep in touch with the webmaster. Some sites, like Fuyens.ch, create a page dedicated to this, with the possibility to send a message. Others only provide a link to an email address. It is important to give the visitor the possibility to express himself.
My CV and professional documents
This was also an idea at the very beginning of the website design. Posting your CV is never useless and it allows you to redirect potential employers to your site and to show in the same time, your knowledge and skills on a real project. In the same idea as for the publications, giving the possibility to the interested persons to download this document and to print it, was necessary. By the way, it is perhaps at this moment of the reflection on the printing that it appeared that the realization would be much easier, even essential, to create a printable PDF, rather than to print a page from the site.
WordPress allows you to upload all kinds of media, starting with images. But it is definitely possible to add other types of documents, like PDFs, music and attach them to your pages. This is what is represented in pink in the page map.
The URL links
By the way, there are two other links (in pink) in the page map. These are not, of course, pages or page templates, but links that have redirection and/or logout functions. Their presence was opportune to note them in the page map, to have a better overview of the whole site.
The modal windows
If there is one feature that should be highlighted when summarizing the advantages of Elementor, it is the ability to create modal windows, to set their parameters, and to manage the functions when validating them. While working on this project, I thought it would be good to implement and understand how a login system works. Even if I was convinced that it would be little used, I created these for academic purposes.
The system works with four modal windows (in yellow) :
- A login window.
- A window to register new profiles.
- A window to recover a lost password.
- A window to change current password.
In addition, there are two standard pages :
- A validation page when creating a new account. This is very important to avoid being attacked by robots that would like to create thousands of accounts without validating them.
- A page to change the password of your own account when it has been declared lost or forgotten.
The search page
Elementor allows you to display the results of certain search criteria in an ad-hoc page. It is also a template that displays the list of posts that match the criteria. It appears when the URL contains the “?s=” parameter. It is possible to create an input form for the search using a widget provided by Elementor, but it is limited to the standard post type provided by WordPress. I invite you to follow my blog if you are interested to know how I created my search engine.
The header and footer
Every modern website has a header and footer. With Elementor, you will not be left on the side of the road. It is possible to add them in many different ways. The page builder allows almost unlimited creation. For example, you can create a floating or transparent header. The same goes for the footer which will be displayed on all pages or only on those of a certain type.
The special pages
I’ll end this post by talking about special pages. Elementor allows you to create page templates that will embellish the website and allow visitors to confirm that they are on the right site, but that it is not responding properly. I thought of creating two pages that are essential to any website :
- The 404 error page.
- The maintenance page, used to suspend the website for an update for example.
That’s it, the topic on the page map is over. As said in the first lines of this post, the page map is one of the steps to be done that you can’t escape, if you want to gain efficiency. Once the page map and wireframes have been created, it is time to launch the realization phase of your website, starting with the installation and settings of WordPress and Elementor.


One Response
How does the author plan to document their thoughts and studies in relation to their travel and cycling experiences?
Regard IT Telkom