Introduction
Today, all websites contain one or more headers, as well as a footer. It seems strange to see a web page without a header, at least to display a menu. Elementor has a template builder in its pro version. It is with this tool that the headers are created.
As mentioned in the previous chapter, Elementor’s Hello theme displays the domain name, as well as the slogan at the top of each page. If you have followed me so far in the creation of my website, you will have a home page that contains the title of the site and its slogan, an H1 title formatted with a style sheet and a button.
One of the first things to do when creating a website is to remove all the unnecessary informations and to start with a blank page. By creating a header with Elementor, you kill two birds with one stone.

Creation of a header
With Elementor, creating a header is very simple. Just go to the menu Templates – Theme Builder and create your header like a classic page. I won’t go into details about header creation, this blog is not an Elementor course.
For the example, I just created a slightly gray section and added my logo on the left.
It is immediately noticeable that the domain name information, as well as the slogan, has disappeared and the header has replaced it.

Creation of the menu
The Menu is a task that is built in WordPress. Elementor just uses a widget to display it and set it up. You can do many things with the menu widget, including managing menus on smartphones.
To create a menu, go to Appearance – Menus. To display it in your header, drag the Menu widget inside your header section.
Adding locations
Vous pouvez créer plusieurs menus dans une seule page. Cela dépend amplement de votre thème. Avec le thème Hello, il n’est pas possible de gérer You can create several menus in one page. It depends a lot on your theme. With the Hello theme, it is not possible to manage multiple locations, but nothing is impossible.
Add the function below in a PHP file, on your child theme, and you will have two new login and logoff locations. You can then assign your menus to the new locations.
function register_menus() {
    register_nav_menus (
      array (
        'login'                 => ('Login'),
        'logoff'                => ('Logoff')
      )
    );
  }
  add_action ('after_setup_theme', 'register_menus');
Adding icons to the menus
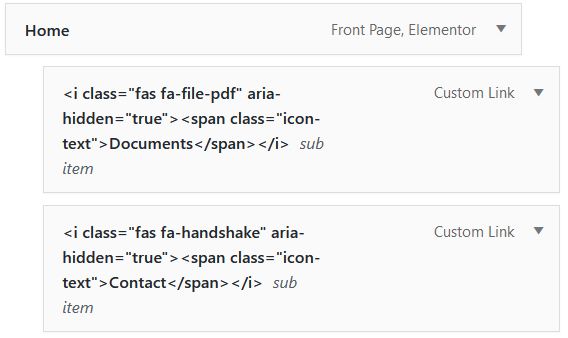
If, like me, you want to add icons to your menus, you can do so directly in the menu creation section. Add to your menu, an HTML tag of type <i>, containing a class whose name is Awesome Font’s own nomenclature. Then, add a second HTML tag of type <span> with the title of your menu.
Example to create the documents menu, insert the html tag <i class=”fas fa-file-pdf” aria-hidden=”true”><span class=”icon-text”>Documents</span></i>, giving this result :
DocumentsTo find the nomenclature, search for your icon on the Awesome Font’s website and copy its name in the menu.
Below, my home menu.

Styling a menu with CSS
Even if Elementor offers a whole range of tools to style your menus, it is also possible to do it with a CSS style sheet, which is very practical if you have several menus with identical styles.
The example below shows a menu with a drop shadow and a blue border on its left side.
.sub-menu {
  box-shadow: 0px 0px 10px 0px rgba(0, 0, 0, 0.5);
  border-left: 12px solid #145DA0!important;
You can also play on the menu box, if it is active or under the mouse pointer (hover). The possibilities are endless.
.sub-menu a {
  background-color: #FCFCFC!important;
  color: black;
}

.sub-menu a:hover, .sub-menu a:active {
  background-color: #FCFCFC!important;
  color: red;
}
Here is the header with a menu whose style has been modified with the CSS code above.

This ends the topic on menus and header. We can tackle an archive page, next topic.


