Introduction
As a starting point for a search filter, there is no other option than to create a form where the visitor can enter criteria according to his query. And in this way, Elementor makes it easy for us by providing in its toolbox, the “form” widget. Once this relatively easy task is added to an archive page, the real challenge can begin. You will have to create a query that will filter and return the result expected by the visitor. You have two choices. The first one is the embedded query engine of WordPress, called “WP Query”. The second is much more classic and also allows you to go much further, it is the SQL (Structured query language). This website uses SQL, a language that has virtually no limits when it comes to querying a database.
How to create a form ?
The “form” widget belongs to the Elementor Pro version. All my blog uses the features of the pro version. There are other plugins to create forms, but one of the advantages of Elementor is that it is already present in the page builder and the page builder can execute PHP code when it is closed.

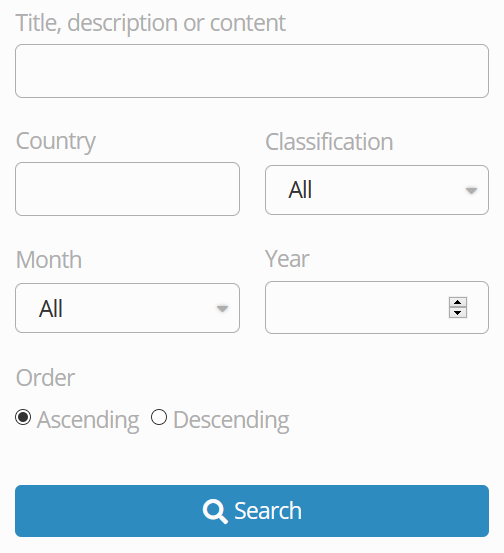
Creating a form with Elementor is as simple as dragging and dropping the widget into a section, adding the fields according to the purpose and configuring its function. Below, the form for my travel section.

Define the fields
When we talk about forms, whether they are created using Elementor or pure HTML, the first task is to define the fields. Indeed, the visitor who wants to search the site’s posts will do it logically. But nobody thinks like everybody else. Defining the fields and creating an adequate form can take a lot of time and thought.
On the point of defining the fields, when we do it for a client, the author of the website is going to begin with a certain logic and put himself in the place of the visitor to ask the real questions. In the realization of a project, a discussion will often take place with the client and it is the role of the analyst to ask the right questions in order to know on what we want to filter the data and thus define the right fields. This is called “people elicitation”. This task takes place during the design and implementation of the project. It is often called “functional design“.
In this website, the form of the travel section is relatively simple. It contains :
- A search field on the title, the content or the description (the extract). It is of type “string”.
- A search field on the country where the travel took place. It is also a “string”.
- A search field on the classification (or taxonomy) of the travel. Again a “string”.
- Two search fields allowing to filter the month and the year.The month is a “string” and the year is a “numerical integer”.
- An option to sort posts in ascending or descending order. Also of type “string”.
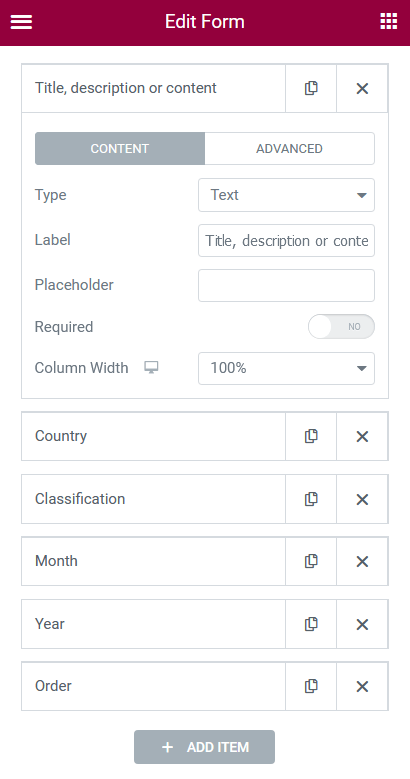
- Create all the fields (below, the example of my type “travel”).
- In the “content” tab, set the type, the field label and other notions if necessary.
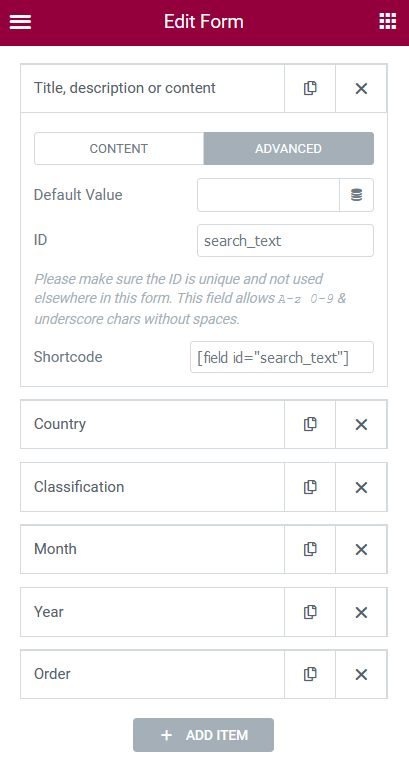
- In the “advanced” tab, give an ID to your field (below, the name of the description field will be “search_text”).


Linking the code and the form
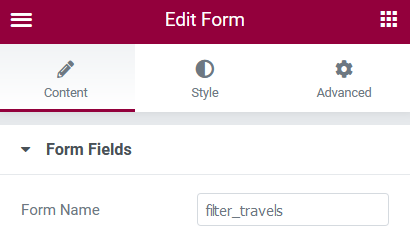
To link the previously added form, you have to give it a name. For this one, its name is “filter_travels”. Not to be confused with the name of the function.
- In Elementor, enter the name in the form.

Calling an Elementor method
Elementor has provided a “hook” in PHP to be able to extract data from the form and perform a query, for example. This is called “elementor_pro/forms/validation”. But let’s start at the beginning.
- Create a file in your child theme with the name “Travels_Query.php” or a name of your choice, and drag it into the “php” folder.
- Create a new entry in your “functions.php” file.
// Travels
include_once ($dir . '/php/OP_Travels_Query.php');- In the file “Travels_Query.php”, create the following hook.
<?php
  /**
  * Plugin Name: Travels_Query
  * Description: Travels archives filter
  * Author: Olivier Paudex
  * Author Web Site: https://www.fuyens.ch
  */

  function travels_filter($record, $ajax_handler) {

  }
  add_action ('elementor_pro/forms/validation', 'travels_filter',10,2);
This is the basis for extracting data from an Elementor form. Now, if you click on the form button, the above code will run.
Two quick notes on hooks in general :
The name of the “travels_filter” function must match its call, below in the “add-action” method.
The two numbers correspond to the execution order and the number of arguments (here, there are two).
- In the PHP function “travels_filter”, enter these lines. This will verify that the code should run on the “filter_travels” form.
// Check the Elementor form name
$form_name = $record->get_form_settings('form_name');
if ('filter_travels' !== $form_name) {
  return;
}
The dropdown lists
To create dropdown lists, it is of course possible to create them with the Elementor interface. But as they tend to repeat themselves, it is perhaps better to create them once and for all with PHP code.
In the example below, the “select_travels_type” function will check that the request comes from the “filter_travels” form, then that the field name is “travel_taxonomy”. If this is the case, it will use the wordpress function “get_terms” to retrieve all the terms of the type travel whose taxonomy has the label “travel_type”. And if there are no errors, the code will add in the first position the entry “All”, return to the line, insert one after the other, all the terms, without adding a line break for the last one.
function select_travels_type ($item, $index, $form) {

    // Check the Elementor form name
    if ('filter_travels' === $form->get_settings_for_display('form_name')) {

      // Check the Elementor field ID
      if ('travel_taxonomy' === $item['custom_id']) {

        // Get all the custom post type terms
        $terms = get_terms('travel_type');

        if (!empty($terms) && !is_wp_error($terms)) {

          // Add the placeholder item
          $item['field_options'] = "All" . "\n";

          // Add item to the selector
          foreach ($terms as $term) {
            $item['field_options'] .= $term->name;

            // Last one, don't add the "\n"
            if (!($term === end($terms))) {$item['field_options'] .= "\n";}
          }
        }
      }
    }
    return $item;
  }
  add_filter ('elementor_pro/forms/render/item/select','select_travels_type',10,3);
A little easier to understand, the code that manages the display of the months of the year.
// Populate Elementor selector form field with Travel months
  function populate_travels_elementor_dropdown_list ($item, $index, $form) {

    // Check the Elementor form name
    if ('filter_travels' === $form->get_settings_for_display('form_name')) {

      // Check the Elementor field ID
      if ('travel_month' === $item['custom_id']) {

        // Add the placeholder item
        $item['field_options'] = "All" . "\n";
        $item['field_options'] .= "January" . "\n";
        $item['field_options'] .= "February" . "\n";
        $item['field_options'] .= "March" . "\n";
        $item['field_options'] .= "April" . "\n";
        $item['field_options'] .= "May" . "\n";
        $item['field_options'] .= "June" . "\n";
        $item['field_options'] .= "July" . "\n";
        $item['field_options'] .= "August" . "\n";
        $item['field_options'] .= "September" . "\n";
        $item['field_options'] .= "October" . "\n";
        $item['field_options'] .= "November" . "\n";
        $item['field_options'] .= "December";
      }
    }
    return $item;
  }
  add_filter ('elementor_pro/forms/render/item/select','populate_travels_elementor_dropdown_list',10,3);
Last list, the “order” radio button. Indeed, the radio buttons work on the same principle as a dropdown list. Add the code below. This one looks like the code for the months display, except that the name and its value are different. To add a value to an option, add the vertical bar, followed by the data in question. In this list, for the option “Ascending”, its value is “asc”.
// Populate Elementor radio form field with ascending and descending order values
  function select_travels_order ($item, $index, $form) {

    // Check the Elementor form name
    if ('filter_travels' === $form->get_settings_for_display('form_name')) {

      // Check the Elementor field ID
      if ('travel_order' === $item['custom_id']) {

        // Add items to the radio selector
        $item['field_options'] = "Ascending" . "|asc" . "\n";
        $item['field_options'] .= "Descending" . "|desc";
      }
    }
    return $item;
  }
  add_filter ('elementor_pro/forms/render/item/radio','select_travels_order',10,3);
Retrieve form data
The next step is to retrieve the form data. Enter the lines of code below, next to the others, in the PHP function “travels_filter”.
// Get the form datas
$fields = $record->get('fields');
$search_text = strtolower($fields['search_text']['value']);
$travel_country = strip_accents(strtolower($fields['travel_country']['value']));
$travel_month = strip_accents(strtolower($fields['travel_month']['value']));
$travel_year = $fields['travel_year']['value'];
$travel_taxonomy = strtolower($fields['travel_taxonomy']['value']);
$travel_order = strtolower($fields['travel_order']['value']);

// Get the terms slug
if ($travel_taxonomy != 'all') {
  $travel_taxonomy = get_term_by('name', $travel_taxonomy, 'travel_type')->slug;
}
I’m skipping the whole explanation of this code, but the syntax is $variable_name = $fields[‘field_name’][‘value’].
- The WordPress function “get_term_by” allows you to retrieve the terms of the taxonomy according to a name. The “slug” at the end of the string is a syntax specific to OOP (object programming), which retrieves the slug instead of the term name. This gives us the assurance that the term is written in lower case and without spaces.
- The PHP function “strlower” returns the characters in lower case.
- As for “strip_accents”, it is a function out of my toolkit that removes all accented characters. Here it is:
function strip_accents($str) {
  return strtr(utf8_decode($str), utf8_decode('àáâãäçèéêëìíîïñòóôõöùúûüýÿÀÁÂÃÄÇÈÉÊËÌÍÎÏÑÒÓÔÕÖÙÚÛÜÝ'), 'aaaaaceeeeiiiinooooouuuuyyAAAAACEEEEIIIINOOOOOUUUUY');
}
Redirection to a new page
All that’s left to do is to create an URL with all the retrieved data, execute the query on the database and display the result. But before coding it, a reminder of the principle of URLs in WordPress :
- To display the home page, enter “https://www.fuyens.ch”.
- To display an archive page with the custom type “travels”, enter “https://www.fuyens.ch/travels”.
- To display an archive page whose custom type is “travels” and search string is “swiss”, enter “https://www.fuyens.ch/travels/?s=swiss”.
- Another equally valid syntax is this one: “https://www.fuyens.ch/?post_type=travels&s=swiss”.
- To display an archive page with the search string “bern” and the country name “switzerland”, enter “https://www.fuyens.ch/travels/?s=bern&travel_country=switzerland”.
Be careful, if you enter the syntax “https://www.fuyens.ch/?s=suisse”, without specifying the type of publications, a search results page will open. We won’t talk about the search results page now, but you should know that it is possible to create one with Elementor, just like an archive page.
Once the URL syntax is acquired, it is easy to complete our code.
- On commence par l’affichage de “https://www.fuyens.ch/” avec la fonction “home_url()“.
- Puis, on ajoute le mot “voyages“, suivi d’un slash (/).
- Puis, on ajoute la syntaxe “?s=” et on y ajoute le contenu de la variable $search_text.
- Puis, on recommence avec tous les autres paramètres de notre formulaire de recherche.
- We start by displaying “https://www.fuyens.ch/” with the “home_url()” function.
- Then, we add the word “travels”, followed by a slash (/).
- Then, we add the syntax “?s=” and we add the content of the “$search_text” variable.
- Then, we start again with all the other parameters of our search form.
A few more infos.
- The PHP function “rawurldecode” allows to replace the formatting characters.
- The special syntax used here is nothing else than a shortened version of “if – else”, which makes it easier to read.
- The notion of “.=” allows to concatenate a string.
- At the end of the code, there is the Elementor method “add_response_data”, which allows to send our “$redirect_url” variable to the browser.
$redirect_url = home_url('travels' . '/');
$search_text ? $redirect_url .= rawurldecode('?s=' . $search_text) : $redirect_url .= rawurldecode('?s=');
$travel_country ? $redirect_url .= rawurldecode('&travel_country=' . $travel_country) : $redirect_url .= rawurldecode('travel_country=');
$travel_month ? $redirect_url .= rawurldecode('&travel_month=' . $travel_month) : $redirect_url .= rawurldecode('travel_month=');
$travel_year ? $redirect_url .= rawurldecode('&travel_year=' . $travel_year) : $redirect_url .= rawurldecode('travel_year=');
$travel_taxonomy ? $redirect_url .= rawurldecode('&travel_taxonomy=' . $travel_taxonomy) : $redirect_url .= rawurldecode('travel_taxonomy=');
$travel_order ? $redirect_url .= rawurldecode('&travel_order=' . $travel_order) : $redirect_url .= rawurldecode('travel_order=');

// Add the redirect to ajax handler and force reload
$ajax_handler->add_response_data('redirect_url', $redirect_url);
And the complete code of the “travels_filter” function.
<?php
  /**
  * Plugin Name: Travels_Query
  * Description: Travels archives filter
  * Author: Olivier Paudex
  * Author Web Site: https://www.fuyens.ch
  */

  function travels_filter($record, $ajax_handler) {

    // Check the Elementor form name
	  $form_name = $record->get_form_settings('form_name');
	  if ('filter_travels' !== $form_name) {
      return;
    }

    // Get the form datas
    $fields = $record->get('fields');
    $search_text = strtolower($fields['search_text']['value']);
    $travel_country = strip_accents(strtolower($fields['travel_country']['value']));
    $travel_month = strip_accents(strtolower($fields['travel_month']['value']));
    $travel_year = $fields['travel_year']['value'];
    $travel_taxonomy = strtolower($fields['travel_taxonomy']['value']);
    $travel_order = strtolower($fields['travel_order']['value']);

    // Get the terms slug
    if ($travel_taxonomy != 'all') {
      $travel_taxonomy = get_term_by('name', $travel_taxonomy, 'travel_type')->slug;
    }

    $redirect_url = home_url('travels' . '/');
    $search_text ? $redirect_url .= rawurldecode('?s=' . $search_text) : $redirect_url .= rawurldecode('?s=');
    $travel_country ? $redirect_url .= rawurldecode('&travel_country=' . $travel_country) : $redirect_url .= rawurldecode('travel_country=');
    $travel_month ? $redirect_url .= rawurldecode('&travel_month=' . $travel_month) : $redirect_url .= rawurldecode('travel_month=');
    $travel_year ? $redirect_url .= rawurldecode('&travel_year=' . $travel_year) : $redirect_url .= rawurldecode('travel_year=');
    $travel_taxonomy ? $redirect_url .= rawurldecode('&travel_taxonomy=' . $travel_taxonomy) : $redirect_url .= rawurldecode('travel_taxonomy=');
    $travel_order ? $redirect_url .= rawurldecode('&travel_order=' . $travel_order) : $redirect_url .= rawurldecode('travel_order=');

    // Add the redirect to ajax handler and force reload
    $ajax_handler->add_response_data('redirect_url', $redirect_url);
  }
  add_action ('elementor_pro/forms/validation', 'travels_filter',10,2);
?>
If all goes well, your browser should display a nice 404 page, with the form output in the URL bar.
But, of course, this is not the expected result. The browser must now know how to send this request to the WordPress database and display the right posts according to the search criteria, in the archive page.
To be continued in the next chapter “Generating a SQL query on WordPress”.


