
Introduction
The posts in the “Biking Tracks” section contain a map, displayed dynamically according to the GPX file attached to them. As the map from the GPX is not a static image file, it is simply impossible for the “DomPDF” library, used on this site to create PDFs, to use it. A screen capture of the map is then necessary to make it available as a real image.
Display of the map
The posts of type “Biking tracks” all contain an attached GPX file. This GPX file displays a dynamic map showing the route contained in it. To achieve this, a plugin has been used, “WP-GPX-Maps”.

- The GPX files are uploaded in the folder “/wp-content/uploads/gpx/”, when creating the post. For more information about this part, please read the post “Attachment links”.
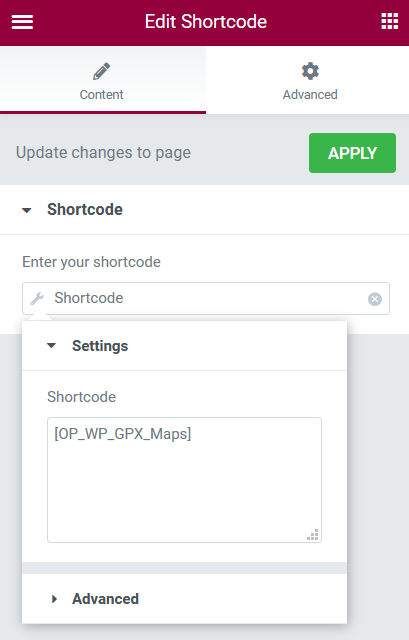
- The “WP-GPX-Maps” plugin displays a map using a short code containing the syntax ‘sgpx gpx=”/wp-content/uploads/gpx/….”‘ (*).
- The maps are displayed using the Elementor “Shortcode” widget. The widget will call the PHP function “OP_WP_GPX_Maps”.
* The syntax of the shortcode is between [ ], but impossible to write it down without executing it.

The PHP function below returns the syntax requested by the “WP-GPX-Maps” plugin, from the ACF file field.
// Get the GPX URL and tranform into a valid shortcode for the 'WP-GPX-Maps' plugin
function transform_GPX_URL_into_shortcode() {

  global $post;

  // Get URL from ACF 'track_gpx_upload' field
  $url = get_field('track_gpx_upload', $post->ID)['url'];

  // Keep only the folder name, without the domain
  $url = substr($url,strpos($url,'/wp-content'));

  // Add info to create the shortcode and return the url string
  // The syntax of the shortcode is between [ ], but impossible to write it down here without executing it.
  return $url = 'sgpx gpx="' . $url . '"';
}
add_shortcode('OP_WP_GPX_Maps','transform_GPX_URL_into_shortcode');
The “dom-to-image” library
To print a PDF with the map, one solution is to capture the image on the screen. Or rather to capture its “DOM node”. Here the node is our Elementor “Shortcode” widget.
Once the node is captured, it still needs to be transformed into an image with a library called “dom-to-image”. This library was created by Anatolii Saienko, on an original idea of Paul Bakaus. You can find all the documentation on his GitHub.
You can also download the library by clicking on the “attachment” link at the top of this post.
Once the library is in your hands, copy it in a “js” folder in the root of your child theme.
Create a folder for each image
For better clarity in managing the captured images, they will be saved in a separate folder.
- All images will be saved in the folder “wp-content/uploads/maps/”, followed by a folder with the post ID and its name.
- The folder will be created when the post is opened, if it does not already exist.
Here is the code that uses the “template_redirect” hook, to execute it when the post is opened :
// Create map folder
function tracks_map_folder() {

  // Global post
  global $post;

  // Only on "tracks" single page
  if (is_singular('tracks')) {

    // Create folder 'maps' with post slug name into uploads folder
    $foldername = wp_upload_dir();
    $postname = $post->ID . '_' . $post->post_name;
    $foldername = $foldername['basedir'] .  '/' . 'maps' . '/' . $postname;

    // Test if folder already exists
    if (!is_dir($foldername)) {
      mkdir ($foldername, 0755, true);
    }
  }
}
add_action('template_redirect', 'tracks_map_folder');
Removing an image
If the post were to be deleted, the image file would also be destroyed through the two functions below :
// Delete map image folder, when a track post is deleted
function delete_map_image($postID, $post) {

  // Get post type
  if ($post->post_type == 'tracks') {

    // Get map image file path
    $foldername = wp_upload_dir();
    $postname = $post->ID . '_' . $post->post_name;
    $foldername = $foldername['basedir'] .  '/' . 'maps' . '/' . $postname;

    // Remove '__trashed' from foldername
    $foldername = str_replace('__trashed', '', $foldername);

    // if exists, delete file
    if (is_dir($foldername)) {
      removeDirectory ($foldername);
    }
  }
}
add_action ('delete_post', 'delete_map_image',10,2);

/************************************************************************************************/

function removeDirectory($path) {

  $files = glob($path . '/*');
  foreach ($files as $file) {
    is_dir($file) ? removeDirectory($file) : unlink($file);
  }
  rmdir($path);

  return;
}
Capture an image
To capture the “DOM node” (the map), a Javascript function will be executed when the post is opened.
As in all code calls written in Javascript, the file of this function will be queued with “wp_enqueue_script”, while strictly limiting its access to the posts of type “Biking tracks”.
In addition, this function will need to save an image of the map. To do this, the location and filename will need to be passed as parameters with “wp_localize_script”.
Here is the code and some explanations :
- The limitation strictly reserved to the “Biking tracks” posts is done by using the “is_singular(‘tracks’)” function.
- The destination folder is “/wp_content/uploads/maps/”.
- Each image is saved in a folder with its ID, followed by its name.
- Each image is saved according to its ID, followed by its name, then the extension “.jpg”.
- Three parameters are passed to the Javascript function, including the full path ($filename) and the full url ($fileurl).
Copy the PHP code below and save it in a file “Enqueue_JS_Scripts.php” or a name of your choice. Then place it in the “php” folder, at the root of the child theme.
// Map To Image
if (!function_exists('MapToImage')) {
  function MapToImage() {

    // Only on single custom post "tracks" type
    if (!is_admin() && (is_singular('tracks'))) {
      $jquery = array ('jquery');
      $version = '1.0';
      $in_footer = true;

      // Global post
      global $post;

      // Get image filename & url
      $foldername = wp_upload_dir();
      $postname = $post->ID . '_' . $post->post_name;
      $fileurl = $foldername['baseurl'] .  '/' . 'maps' . '/' . $postname . '/' . $postname . '.jpg';
      $filename = $foldername['basedir'] .  '/' . 'maps' . '/' . $postname . '/' . $postname . '.jpg';

      // Parameters to javascript function
      $parameters = array(
        'filename' =>  $filename,
        'fileurl' => $fileurl,
        'stylesheet_directory_uri' => get_stylesheet_directory_uri()
      );

      // Enqueue script
      wp_enqueue_script('MapToImage', get_stylesheet_directory_uri() . '/js/MapToImage.js', $jquery, $version, $in_footer);
      wp_localize_script('MapToImage', 'parameters', $parameters);
    }
  }
}
add_action('wp_enqueue_scripts', 'MapToImage');
The “captureImage” function
Now we have to create the file “MapToImage.js” in the “js” folder at the root of the child theme. This file will contain the “captureImage” function.
As the call is made at the opening of a “Biking tracks” post, the function will have to wait for the map to be loaded and displayed on the screen before it can be captured. For this, the capture function “captureImage” will be executed after a delay of 500ms.
Below is the code, with some explanations :
- An HTTP request will check that the map image does not yet exist. The status “HTTP 200” returns to the browser that the file exists. You just have to reverse this status.
- The function will then create a variable “phpfile” which will contain the name of a file to execute, “Save_Image.php”.
- The function will then retrieve the “DOM node” whose IDs contain “wpgpxmaps_” and place the result in a “node” variable.
- Then, calling the function “domtoimage.toJpeg” will give us the JPEG image data in “base64-encoded” format, from the “node” variable.
- The last step consists in opening an Ajax request by passing in “POST” parameters, the name of the PHP file to be executed, the data of the image, as well as its name.
// Delay to give the map time to load
var delay = 500;
var timeout = 0;

// On window load, call captureImage with a delay
jQuery(window).on("load", function() {
  timeout = setTimeout(function() {
    captureImage (parameters.filename, parameters.fileurl, parameters.stylesheet_directory_uri);
  }, delay);
});

/*****************************************************************************************************/

function captureImage(filename, fileurl, stylesheet_directory_uri) {

  // Check if map exist
  var xhr = new XMLHttpRequest();
  xhr.open('HEAD', fileurl, false);
  xhr.send();

  // Create map only if file doesn't exist
  if (xhr.status != 200) {

    // PHP File to call with the POST method
    phpfile = stylesheet_directory_uri + "/php/Save_Image.php";

    // Get the map
    node = document.querySelector('[id*=wpgpxmaps_]');

    // Save the map as JPEG
    domtoimage.toJpeg(node, {quality: 0.95}).then(function (dataURL) {

      // Call php file and attach the dataURL with the POST method
      var ajax = new XMLHttpRequest();
      ajax.open("POST", phpfile, true);
      ajax.setRequestHeader("Content-type","application/x-www-form-urlencoded");
      ajax.send("image=" + dataURL + "&filename=" + filename);
    });
  }
}
Saving the image as a JPEG
Why not save the image directly with the “domtoimage.toJpeg()” function? Well, that’s impossible! This JS code runs locally and the saving is done on the server, therefore the call to the Ajax request.
- To save the image in JPEG format, you have to create the file “Save_Image.php”, in the “php” folder, at the root of the child theme.
- This file, called by the Ajax request above, will retrieve the image data, decode it, and finally save it.
<?php
  /**
  * Plugin Name: Save_Image
  * Description: Save an image from the POST parameter
  * Author: Olivier Paudex
  * Author Web Site: https://www.fuyens.ch
  */

  // Global post
  global $post;

  // Transform DataURL to a decoded image
  $image = $_POST["image"];
  $image = explode(";", $image)[1];
  $image = explode(",", $image)[1];
  $image = str_replace(" ","+", $image);
  $image = base64_decode($image);

  // Get the image filename
  $filename = $_POST["filename"];

  // Save image
  file_put_contents($filename, $image);
?>
To summarize
If you’ve lost the thread of the explanation, here’s what you should have :
- A “wp-content/uploads/maps/ID+name” folder, created automatically when a post is opened.
- A JS file “dom-to-image.js”, containing the library of the same name, which must be located in the “js” folder.
- A PHP file “Enqueue_JS_Scripts.php”, which must be located in the “php” folder. This one contains a “MapToImage()” function which will queue the JS file “MapToImage.js”.
- A JS file “MapToImage.js”, which must be in the “js” folder. This one executes, after a delay of 500ms, the “captureImage” function. The function will open an Ajax request, which will open the PHP file “Save_Image.php”.
- A PHP file “Save_Image.php”, which must be located in the “php” folder. This one will decode the image data and save it in JPEG format.
And here’s how it works :
- When opening a “Biking tracks” post, it will open the attached GPX file to display it in an Elementor “Shortcode” widget . The map is dynamically produced by the “WP-GPX-Maps” plugin.
- The displayed map is then captured and saved in JPEG format in a folder “/wp-content/uploads/maps/ID+Name/.
- The name of the image, which has the same name as the folder, is added.
- When opening the PDF file, the DomPDF library uses the image to create the PDF.
The final word
This is certainly not the only way to proceed. But no matter which way is chosen, capturing the image is the only valid solution. The capture of the geographic map being done on the browser, thus locally, posed the problem of saving the image on the server, solved by the Ajax request.
Have fun.


