Introduction
This site uses attachments in two of the three customized types of posts, the bike tracks and the computer blog. For the tracks section, the links are present on all the posts as they are the GPX files, namely the files that plot the track and can be read on any GPS device. In the computer blog section, the files can be of any nature, often a configuration or system file that supports the subject. The basic idea was to be able to upload an attachment directly when writing the post via the WordPress interface, without it becoming unavailable if the post had to change location. This is where, what is also called in WordPress terms, the attachment.
The ACF field of file type
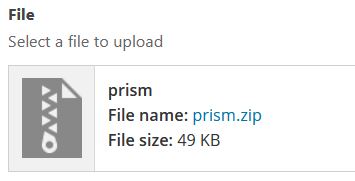
ACF allows you to create file type fields and this is exactly what we are talking about so that the editor of the post can upload a file from the Gutenberg interface of WordPress.

The parameters are by default. Once the field has been created in ACF, you can see a new possibility to add a file in the editor.

Authorization of special file types
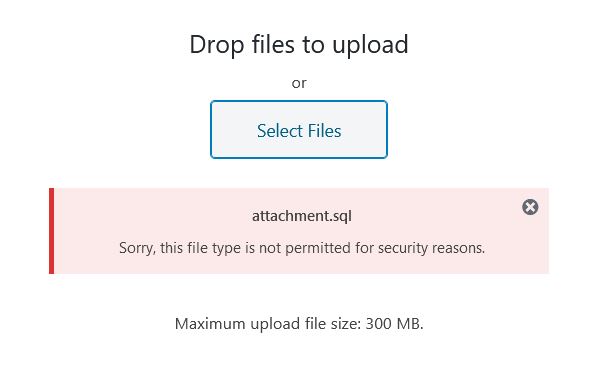
WordPress only allows uploading of certain file types, such as JPG or PNG images, DOC or XLS documents, but not files with extensions such as SQL. There is always a risk to allow other file types, but it is possible to do so.

The wp-config.php file
This file contains the global parameters of the WordPress installation, such as the name of the database, the administrator’s login, and even his password. Be careful, all this information is not encrypted, so do not disclose it.
To authorize a certain type of files, you will have to add a configuration line to the file wp-config.php.
/** Authorized files */
define('ALLOW_UNFILTERED_UPLOADS', true);
But that’s not all. We still need to add the MIME file type to the configuration.
How to find the MIME type of the file ?
Every file belongs to a certain type called MIME. Even if a file has an extension like TXT, it is not necessarily of text type. This trick is often used by computer viruses to fool the user and/or the system. To verify that the file type is what it claims to be, you need to check its MIME type. There are several free online programs to perform these tests, including this one:
https://htmlstrip.com/mime-file-type-checker
For example, to authorize the file of type SQL above, the software returns me the type “text/x-Algol68”
Allow a MIME type
You will have to create a new PHP file and add these few lines to it. The syntax is always the same. You just need to know the file extension and its MIME type. It is possible to add several MIME types for a single extension, but always one extension per line of code.
// Authorize SQL files to be uploaded into the media library
function autorize_tracks_mimes_type ($mime_types) {

  /* Use a mime type check application like 'https://htmlstrip.com/mime-file-type-checker' to retrieve mime type */

  // Adding gpx extension
  $mime_types['sql'] = 'text/x-Algol68';

  return $mime_types;
}
add_filter ('upload_mimes', 'autorize_tracks_mimes_type');
Once the interface with ACF has been set up and the type of file authorized, the editor of the post can upload an attachment that will automatically link to it. The status of the file can be seen in the Media tab of WordPress which notes that the file is attached. In other words, it has become an attachment of the post.
Change the destination of uploaded files
By default, WordPress will upload files in the “uploads” folder, which is a sub-folder of “wp-content”. The files are then sorted by year, then by month. If the files are images, WordPress will automatically resize the images in several formats before displaying them in the Media library.
When uploading files related to posts, especially if they are not images, it may be a good idea to save them in other folders. To do this, add the code below to a PHP file.
// Change upload path for IT attachments files
function upload_it_attachment_prefilter($errors) {
  function field_name_upload_dir($uploads) {

    // Upload path
    $uploads['path'] = $uploads['basedir'].'/it';
    $uploads['url'] = $uploads['baseurl'].'/it';
    $uploads['subdir'] = '';
    return $uploads;
  }
  add_filter('upload_dir','field_name_upload_dir');
  return $errors;
}
add_filter('acf/upload_prefilter/name=it_file_upload', 'upload_it_attachment_prefilter');
Elementor is not the only one to offer extensive features to add functionality to a website. ACF also does this. Above the called filter is called “upload_prefilter” and will run whenever the field “it_file_upload” is encountered.
The second filter called “upload_dir” is a WordPress function that will redirect the upload to a personal folder.
In the example, the destination folder becomes “/wp-content/uploads/it”. All files uploaded from the editor and the ACF field will end up in this new folder.
The attachment link
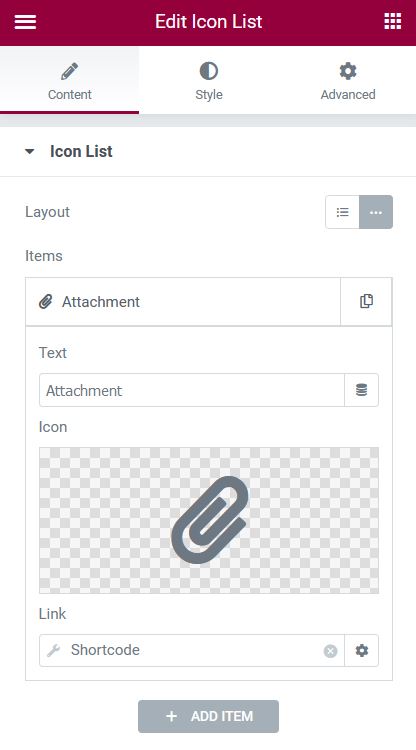
Now that the interface for uploading a file is ready, that the file is authorized and that its destination has been modified, it remains to perform the reverse path so that the visitor can download the attachment. The principle remains the same as for the “Print” link. The Elementor widget used here is the icon list. This one allows to create URL links, with text and image. But above all, this link must be dynamic, because it is different for each post. The solution chosen here is the short code.

The shortcode
The short code called here by the “Attachments” link has the name “IT_Attachment_Page_Link”, which must be placed between square brackets.
Once the widget is configured with the shortcode name, you need to add it to the child theme. To do this, you need to create a new PHP file and insert the code below.
// Get the permalink of the IT attachment page
function it_attachment_page_link () {

  global $post;

  // Retrieve all attachments for the current post
  $attachments = get_posts(array(
    'post_type'      => 'attachment',
    'posts_per_page' => -1,
    'post_parent'    => $post->ID,
    'post_status'    => 'inherit'
  ));

  // If there is an attached file corresponding to the post, return permalink of the attachment page
  foreach ($attachments as $attachment) {
    if ($attachment->guid == get_field('it_file_upload', $post->ID)['url']) {
      return get_permalink($attachment->ID);
    }
  }
}
add_shortcode ('IT_Attachment_Page_Link','it_attachment_page_link');
The above code is relatively simple.
- First, we use a global variable “$post”, which represents the post.
- We will then create a WP_Query to retrieve all the attachments of the post according to the ID of the post.
- Finally, we compare the URL of the attachment with that of the ACF field “it_file_upload”. If the two URLs match, then the post has an attachment.
Why compare the two URLs ? The purpose of this check is to recover the correct URL of the attachment. Indeed, it is quite possible that the post has several attachments, including highlighted images, for example.
The shortcode will return the URL of the attachment to the “Icon List” widget and thus create the download link.
Display the download link
The link is now displayed in the post and its URL is automatically added based on the location of the attachment. But what if the post does not contain an attachment? The answer is obvious, the link will still be displayed, but it will not be actionable.
Unfortunately, Elementor has not provided the ability to show or hide a widget depending on its state. But no matter, others have done it. The “Dynamic Conditions” plugin does this magic trick. It is certainly also possible to do it in Javascript.

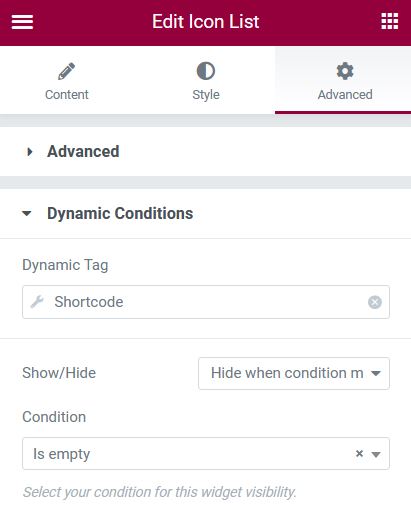
This one integrates with Elementor by creating a “Dynamic Conditions” tab. The principle is relatively simple. A field is compared with a state or a text string and it is displayed or hidden according to the result.
In the example below, the short code is reused (it is the same one that was configured for the URL link). Its content is compared to the “empty state”. If the case is positive, then the “attachment” link is hidden.

The limit of possibilities does not end here. It is quite possible to compare any dynamic field with another. This plugin is very handy and it’s really surprising that Elementor didn’t integrate this feature natively in its page builder.
Download of the attachment
The parenthesis on the “Dynamic Conditions” plugin closed, it remains only to perform the download. For this, you need to master some notions of WordPress and HTML.
- The first one is an infrastructure issue related to WordPress. In the WordPress database, all posts are stored in a table called “wp_posts”. The posts have a type associated with them. By default this type is “posts” or the name of the custom type. In the example of this site, all the posts of the computer blog have the type “it”. But what is really interesting is that the attachments also have a type. And this one is of type “attachment”. In other words, all attachments are regular posts, have an ID, and are stored in the same “posts” table as regular posts.
- The second one results automatically from the first one. When you click on the link of an attachment, its content is displayed in a new page, as if it were another post.
Once these notions are known, we can easily deduce that we will have to find a trick to redirect the URL link of the attachment, not to a new page, as it is the case by default, but to the browser, so that it proposes to download it.
Redirecting a template
WordPress offers a hook called “template_redirect”. This hook is executed each time a new template is displayed. More simply, each time a post, a page, an attachment, a media is displayed, WordPress executes the hook “template_redirect”.
You can then take control and change the course of things by downloading the attachment, rather than displaying it. Here is the code :
// Check if the page is an attachment and force download it
function download_it_attachment_page() {

  global $post;

  // Check if attachment page
  if (is_attachment()) {

    // Get custom post type of attachment
    $post_type = get_post($post->post_parent)->post_type;

    // Check if attachment is of type "it"
    if ($post_type == 'it') {

      // Get attachment filepath
      $filename = get_attached_file($post->ID);

      // Get the mime type of the attachment
      $mime_type = $post->post_mime_type;

      // Discard all buffers before reading file
      while (ob_get_level()) {
        ob_end_clean();
      }

      header("Content-Type: " . $mime_type, true, 200);
      header("Content-Transfer-Encoding: Binary");
      header("Cache-Control: must-revalidate, post-check=0, pre-check=0");
      header("Pragma: no-cache");
      header("Expires: 0");
      header("Content-Length: " . filesize($filename));
      header("Content-Disposition: attachment; filename=" . basename($filename));
      readfile($filename);
      exit();
    }
  }
}
add_action('template_redirect','download_it_attachment_page');
The above code can be explained as follows :
- A global variable “$post” is used to represent the attachment. Indeed, WordPress has already passed on the page of the attachment, without having displayed it yet.
- A condition checks that the processing is indeed for an attachment.
- Another condition checks that the attachment is of type “it”. For this, we get the type of the post.
- The name of the attachment is then retrieved, as well as its MIME type.
- Finally, a new header is created, in order to instruct the browser to download the attachment.
A small note about the two functions “ob_get_level” and “ob_end_clean”. The first one indicates the number of currently active memory buffers. The second one allows to delete a buffer and not to send it to the browser. It is essential to delete all open buffers before creating new ones, so that the downloaded file corresponds to the original. Without this precaution, the file could be modified and become unusable.
The final word
Here again, Elementor and WordPress are enough to create from scratch a system for uploading attachments linked to posts. Except for the display of the link according to its state managed by a third party plugin (which could very well be replaced by a few lines of Javascript), the WordPress functions are marvels of simplicity as much for redirecting to a template (thanks to the template_redirect action) or displaying a URL on an Elementor link (thanks to the shortcodes). By looking a little, no need to install multitudes of third party plugins.


