Introduction
Like the archive page, the single post page is also a template offered by Elementor and works in the same way. You can create sections, place different widgets including the content to be displayed. It is also possible to add a comment window.
The two main widgets
This chapter will not describe in details the realization of my post page, but rather the creation and customization of a comment area where the visitor can leave a word of encouragement, a criticism, raise a point, etc. …


The two widgets above that make up the post page are the only two in the entire set of widgets provided by Elementor that do not have the “style” tab. Indeed, the content displayed by these elements is based on the installed theme. In this website, it is the “Hello” theme provided by Elementor, and to be more exact, the child theme, as mentioned in the post on this topic.
Style sheets and other parameters
In the “functions.php” file, a reference to the PHP file “Enqueue_CSS_Styles.php” to load the stylesheets in queue, will be added. Then the file will be created in the “php” folder.
// Others
include_once ($dir . '/php/Enqueue_CSS_Styles.php');
Put the style sheet for the comment area in the queue
If you followed my blog, the chapter about the child theme mentioned a style sheet whose name was “Main_Styles.css”. This time, the style sheet will be named “Comments_Styles.css”.
Unlike the “Main_Styles.css” file, the comments file will only run on the post pages. This can be set by adding a test of type “is_single()”.
Also, we want this style sheet to run only on the site pages and not on the administration console. We will add a test of type “!is_admin()”, the exclamation mark representing the negation. Moreover, the action to be performed only applies to the pages of the site. We will only add the action “wp_enqueue_scripts”.
- Create this file and place it in the “css” folder, then complete the “Enqueue_CSS_Styles.php” file.
<?php
  /**
  * Plugin Name: Enqueue_CSS_Styles
  * Description: Enqueue CSS Styles
  * Author: Olivier Paudex
  * Author Web Site: https://www.fuyens.ch
  */

  // Enqueue CSS Styles
  function Main_Styles() {
    wp_enqueue_style('Main_Styles', get_stylesheet_directory_uri() . '/css/Main_Styles.css', false, '1.0.0');
  }
  add_action('wp_enqueue_scripts', 'Main_Styles');
  add_action('admin_enqueue_scripts', 'Main_Styles');

  /*************************************************************************************************************************************/

  // Enqueue Comments CSS Styles
  function Comments_Styles() {
    if (!is_admin() && (is_single())) {
      wp_enqueue_style('Comments_Styles', get_stylesheet_directory_uri() . '/css/Comments_Styles.css', false, '1.0.0');
    }
  }
  add_action('wp_enqueue_scripts', 'Comments_Styles');
?>
WordPress settings
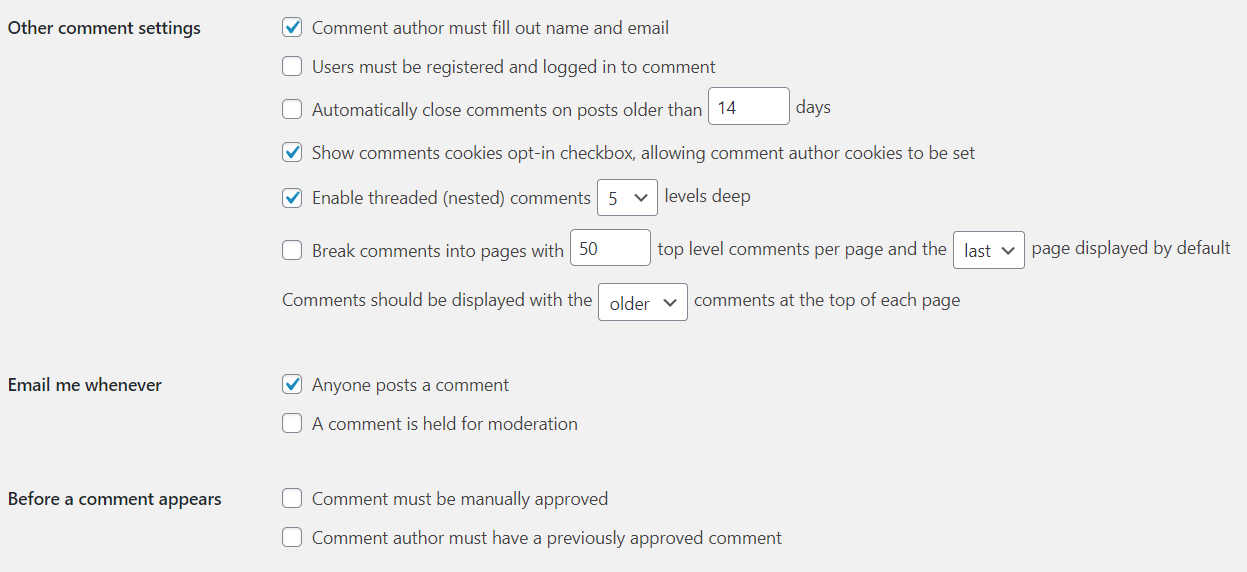
The first task to perform is located in the settings of WordPress. You must allow visitors to post a comment.
- In the “Settings – Comments”, check the first 3 options.

- Then check the other options as you wish. I recommend these.

CPT UI plugin settings
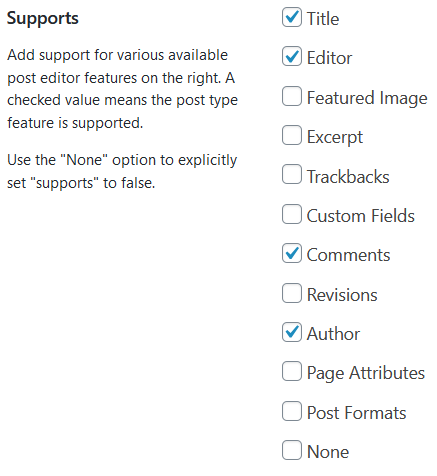
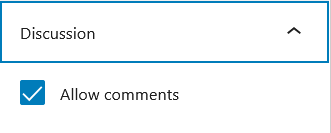
In the settings for each type of custom posts, check the “Comments” option. This allows you to open or close the comments for each post.


Customization of the comments area
The Elementor widget of the comments post displays by default, on a post page, this design.

Make a style sheet responsive to different screens
Before starting to modify the look of the comment area, it is good to keep in mind that it must also respond to different screen sizes. For this, it is possible to use a CSS function called “@media only screen and …”.
To keep the Elementor specifications, we need to make the website responsive on three different screen sizes, namely desktop, tablet and mobile. For each size, we can configure the dimensions in the Elementor settings.
This site uses the following dimensions which are standard :
- Desktop computer : Minimum size of 1024 pixels
- Tablet : Size between 768 pixels and 1023 pixels
- Mobile : Maximum size of 767 pixels
Here is a standard example of how to make a CSS style sheet adaptive to screen sizes.
/* Desktop */
@media only screen and (min-width: 1024px) {
  :root {
    --font_size: 18px;
    --flex_direction: row;
  }
}

/* Tablet */
@media only screen and (min-width: 768px) and (max-width: 1023px) {
  :root {
    --font_size: 17px;
    --flex_direction: row;
  }
}

/* Smartphone */
@media only screen and (max-width: 767px) {
  :root {
    --font_size: 16px;
    --flex_direction: column;
  }
}
And here is how to dynamically use a variable in a class or a CSS ID. Below, the two classes will use as font size, the variable “font_size” and adapt automatically according to the screen size.
/* Normal font size */
.logged-in-as a, .comment-form-comment {
  font-size: var(--font_size);
}
The main classes and IDs to modify the style of the comment area
Here are some of the many classes that can be used to customize this area. Don’t forget the periods or the hashes in front of the names of the classes or identifiers.
- .comment-reply-title, allows to modify the title “Leave a comment”.
- .title-comments, allows you to change the title of the number of replies.
- #cancel-comment-reply-link, allows to modify the title “Cancel reply”.
- .comment-reply-link, allows you to modify the style of the “Reply” link.
- .reply, allows you to position the “Reply” link.
- #submit, allows you to modify the style of the “Leave a comment” button and its label.
- .form-submit, allows you to position the “Leave a comment” button.
- .comment-form, allows you to modify the whole form’s entry zone.
- #author, #email, #url, allows to modify the content of the form’s zones.
- .logged-in-as a, allows to modify the link “Logged in as Olivier Paudex. Logout ?”, if the user is connected to your site.
- .comment-policy (comment-notes), allows to modify the label “Your email address will not be published. Required fields are marked with a *.”, if the user is not connected to your site.
- .comment-form-author label, .comment-form-email label, .comment-form-comment label, .comment-form-url label, allow you to modify the different labels in the entry zone.
- .says, allows you to modify the word “says”, next to the author’s name.
- .comment-content, allows you to modify the content zone of the comment.
- #comment, .comment-body, #author, #email, #url, allows to modify the different entry zones of the comment.
- .comment-meta, allows you to manage the “author, date and time of the comment and management links” block.
- .fn and .fn a, allow to modify respectively the name of the author of a comment and the name of the connected author.
- .comment-metadata a, allows you to modify the date and time of the comment only.
- .edit-link a, allows to modify the links “spam, delete, modify”, next to the date and time only.
- .avatar, allows you to modify the author’s photo.
- span.required, allows to modify the star indicating that the field is required.
Below, an extract of the style sheet which allows to modify the button.
/* Buttons */
#submit, .comment-reply-link {
  background-color: #2E8BC0;
  border-style: none;
  color: #FCFCFC;
  font-family: 'Open Sans', sans-serif;
  font-weight: 400;
  letter-spacing: -0.5px;
  line-height: 1.2em;
  border-radius: 5px;
  padding: 10px 20px 10px 20px;
}

/* Buttons hover */
#submit:hover, .comment-reply-link:hover {
  background-color: #145DA0;
  color: #FCFCFC;
}

/* Submit button */
.form-submit {
  display: flex;
  justify-content: center;
  margin: 20px 0px 20px 0px;
}
Below, the comments area modified according to the style sheet.

The “Simple Comment Editing” plugin
Once the comment is sent for publishing, it can’t be modified and it’s a pity. If only to correct a spelling or grammatical error, editing a comment should be possible. And yet, WordPress has not provided this. But it is without counting the huge contribution of independent authors, who allow us to add such features through plugins, that WordPress has become so popular.
For editing comments, there is a plugin called “Simple Comment Editing”.

The plugin is very easy to use. It has only one parameter, the edit timer, which takes a value in minutes.

Customize the plugin with a style sheet
As for the comments form, it is also possible to modify the style of this plugin.
- button.sce-comment-save, button.sce-comment-cancel, button.sce-comment-delete, allow to modify the three buttons of validation, cancellation and deletion.
- .sce-comment-edit-buttons, allows to position the buttons.
- .sce-edit-button a, allows to modify the “Click to edit” link.
- span.sce-timer, span.sce-seperator, allows to modify the separator and the timer.
- .sce-textarea, allows to modify the buttons area.
- .sce-comment-text, allows you to modify the comment zone.
Other features
The comment area does not stop only at its design. It is also possible to adjust other elements. For this, another PHP file must be added. This time it will be called simply “Comments.php”. It is located in the “php” folder.
Filter “comment_form_defaults”
It is possible to add a note before or after the comment entry zone using the “comment_form_defaults” filter.
function comment_policy_text($args) {

  // Text before
  $args['comment_notes_before'] = "<p class='comment-policy'>text before</p>";

  // Text after
  $args['comment_notes_after'] = '';
  //$args['comment_notes_after'] = "<p class='comment-policy'>text after</p>";

  // Title by default
  $args['title_reply'] = "<p class='comment-title'>Leave a comment</p>";

  return $args;
}
add_filter('comment_form_defaults', 'comment_policy_text');
Filter “comment_form_default_fields”
It is possible to modify some fields by default, with the “comment_form_default_fields” filter. Below, an example of deleting the URL field.
// Remove comment field URL
function remove_comment_url($arg) {
  $arg['url'] = '';
  return $arg;
}
add_filter('comment_form_default_fields', 'remove_comment_url');
Filter “edit_comment_link”
It is possible to add, for the adminstrator only, management links “Spam, Delete, Edit”, with the filter “edit_comment_link”.
// Add Spam, Delete, Update links to comments
function comment_links($link,$id) {

  // Link
  $template = '<a class="comment-edit-link" href="%1$s%2$s">%3$s</a>';
  $admin_url = admin_url("comment.php?c=$id&action=");

  // Spam.
  $link = sprintf($template, $admin_url, 'cdc&dt=spam', '[Spam]');

  // Delete.
  $link .= sprintf($template, $admin_url, 'cdc', '[Delete]');

  // Update
  $link .= sprintf($template, $admin_url, 'editcomment', '[Edit]');

  return $link;
}
add_filter('edit_comment_link','comment_links',10,2);
Filter “comment_reply_link”
It is possible to add the first name of the person posting a comment in the reply link, with the “comment_reply_link” filter.
// Add first name to reply link and create a button
function reply_links($link,$args,$comment) {

  $comment = get_comment($comment);

  // If no comment author is blank, use 'Anonymous'
  if (empty($comment->comment_author)) {
      if (!empty($comment->user_id)){
          $user=get_userdata($comment->user_id);
          $author=$user->user_login;
      } else {
          $author = 'Anonymous';
      }
  } else {
      $author = $comment->comment_author;
  }

  // If the user provided more than a first name, use only first name
  if (strpos($author, ' ')) {
    $author = substr($author, 0, strpos($author, ' '));
  }

  // Add a div to the structure of the reply link
  $template = '<div class="reply-button">';

  // Replace Reply Link with "Reply to Author First Name"
  $reply_link_text = $args['reply_text'];
  $link = str_replace($reply_link_text, 'Answer to' . ' ' . $author, $link);

  // Close the div structure
  $link = $template . $link . '</div>';

  return $link;
}
add_filter('comment_reply_link','reply_links',10,3);
Move the comments below the input field
By default, the entry zone is below the comments. It is possible to move it above the comments by following this simple trick.
In the “Hello” theme, Elementor has created a template called “comments.php”. Be careful not to confuse it with our configuration file which is located in the “php” folder of the child theme.
- Copy this file from the “Hello” theme to the child theme, at the root, in the same place where the “functions.php” file is located.
- Move the code portion to the right place and save the file. It should be just below the “Comment Reply Script” portion.
<?php
/**
 * The template for displaying comments.
 *
 * This is the template that displays the area of the page that contains both the current comments
 * and the comment form.
 *
 * @package HelloElementor
 */

if ( ! defined( 'ABSPATH' ) ) {
	exit; // Exit if accessed directly.
}

// Comment Reply Script.
if ( comments_open() && get_option( 'thread_comments' ) ) {
	wp_enqueue_script( 'comment-reply' );
}
?>

<!-- Comment Form moved above comments -->
<?php
comment_form(
	array(
    'title_reply_before' => '<h2 id="reply-title" class="comment-reply-title">',
		'title_reply_after'  => '</h2>',
	)
);
?>
The final word
Here is the chapter on the comments area done. All the tools are gathered to create beautiful post pages. We can see here, the power of the CSS style sheet which is here essential to the implementation of a comment section. Another very good reason to create a child theme to add your own code. The next chapter will lead us to the printing of a PDF.


2 Responses
Hi 🙂 I just want to mention I am just very new to weblog and certainly enjoyed you’re page. Almost certainly I’m planning to bookmark your site . You really come with terrific posts. Thanks for sharing with us your blog site.
Its like you read my mind! You appear to know so much about this, like you
wrote the book in it or something. I think that you could do with some pics to drive the message home a little bit,
but instead of that, this is excellent blog. A fantastic read.
I’ll definitely be back.
Comments are closed.