Introduction
Printing a publication is not an option provided by WordPress, nor by Elementor. This may seem logical in the sense that a website should be digital and not in paper format. Nevertheless, it is sometimes very practical to keep a trace of a publication before it disappears. Another use of printing will most certainly be billing forms for commercial sites. In any case, printing from a website can be tedious. To stay within the norm, the best way is to convert your page to PDF, then print it. To do this, WordPress needs an extension that is often called HTML to PDF.
The Print link
The first task to perform is most certainly the link that will execute the PDF creation. With Elementor, you can use a button, or any widget with the ability to redirect to a URL. On this site, the widget used is the icon list.

The list of icons allows you to create URL links, with a text and a small image from the Awesome Font library. As this link will appear on the single publication template, it must be dynamic. In other words, the link is different on each page. To achieve this, one solution is to use a short code.
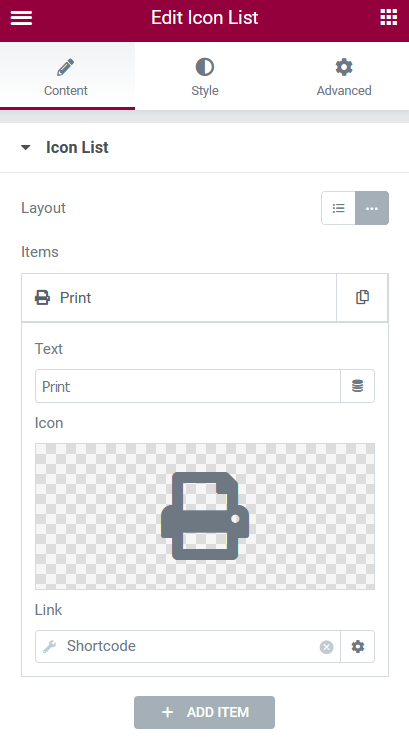
The shortcode
As stated above, the shortcode will replace a URL link and allow to make it dynamic. The short code is nothing more than a call to a PHP function, which will return the URL according to the title of the publication.
The call to the short code is done between square brackets, here [Print_PDF_Tracks].
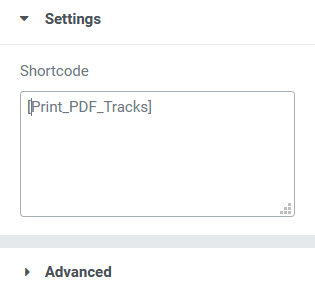
Once the widget is configured with the shortcode name, you need to add it to the child theme. To do this, you need to create a new PHP file and insert the code below.
The URL link will be created from the website address, then the “pdf-tracks” folder and finally the name of the publication. Example for a publication whose title is “The best of WordPress”, the link would give “https://www.fuyens.ch/pdf-tracks/the-best-of-wordpress”.
Notice here the use of a global variable $post which contains the current publication. It allows to retrieve, among other things, the title.
function print_pdf_tracks() {

  global $post;
  return home_url('pdf-tracks/') . $post->post_name;
}
add_shortcode ('Print_PDF_Tracks','print_pdf_tracks');
The WordPress template
Creating a WordPress template is still very topical, even if the site is made with Elementor. Even if Elementor allows to create reusable templates, with its GUI interface, it is still possible to do it the WordPress way, that is to say by PHP code. WordPress literature is full of examples citing the famous “WordPress Loop”. At the beginning of the creation of this website, a little over a year ago, when the tool chosen to build the pages was Elementor, the use of this famous loop was not obvious. And yet it is very simple. Here are the three main steps to follow.
- Creating a template in PHP
- Create an empty page
- Linking the page and the template
The PHP model
To create a PHP template, you have to create a new PHP file and insert a header. In the example below, the PHP file is named “pdf-it.php” and the name of the template is “IT PDF”.
The recommendation is to create a new folder, whose name is “templates”, at the root of the child theme, at the same hierarchical level as the “php, css, js” folders, and to put the PHP file there.
The really essential line is this: The template name: IT PDF.
The first three lines of code below the header are here for security reasons. The template can only be called with an absolute pathname. All templates should start with these lines.
<?php
  /**
  * The template name: IT PDF
  * Description: IT PDF Template
  * Author: Olivier Paudex
  * Author Web Site: https://www.fuyens.ch
  */

  if ( ! defined( 'ABSPATH' ) ) {
	  exit; // Exit if accessed directly.
  }
?>
The empty page and the link with the template
Once the template is created, you must create an empty page in WordPress, because it cannot directly call a PHP template. The name of this page must correspond to the name given to the URL link. In this example, it will be “PDF-IT”.
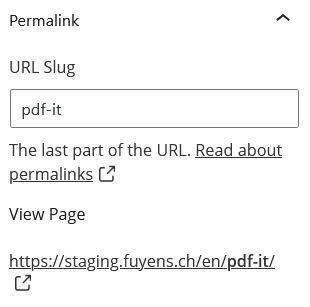
In fact it is not really the name of the page that is important, but its “slug”, as well as its URL path, also called “permalink”. You can see it in the page settings on the right.
In the example below, the permalink still has an “en” folder. The site was created in two languages, French and English. At the time of the screenshot, the language folder was automatically added. This blog contains a chapter about multilingualism, called Polylang. It features the Polylang plugin with which this site was created.
The last setting to change is the page attribute. You have to select the template created before with PHP, to link the page with the code.
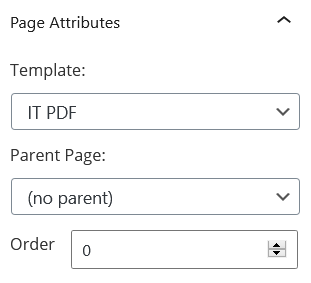
Once this step is done, all links that start with “https://www.fuyens.ch/pdf-it/…”, will execute the “IT PDF” template. This is simple and fully compatible with Elementor templates.
The PDF librairies
Once the structure is created, you have to choose a library that will convert the HTML code of the page into PDF. To do this, several tools are available.
Here are some of them :
FPDF
FPDF is a PHP oriented tool. It executes PHP code to create a PDF. Completely free and very useful to create billing forms with tables, for an e-commerce site, for example. It remains very simple to use, does not use other libraries apart from its own. His website is very well documented. I highly recommend it to create PDF forms.
mPDF
mPDF is a library that uses FPDF and HTML2FPDF. The advantage over FPDF is undoubtedly that it can convert HTML code into PDF. Moreover, it has the possibility of using CSS style sheets to modify the appearance of the page. Its installation requires a little advanced mastery, using the “Composer” tool, which was not compatible with the host on which this site was installed.
TCPDF
TCPDF is certainly the most elaborate free tool to date. It can convert from HTML to PDF, create headers, use truetype fonts. It is the only one that can execute Javascript code. It has so many possibilities that it has become almost too complex to implement. Like mPDF, it is entirely autonomous. The only drawback to its durability is that it is no longer supported. Its creator having decided to launch a new project, still in development, tc-lib-pdf.
DomPDF
DomPDF is a completely autonomous and free library. It is very easy to set up in a WordPress infrastructure. It is CSS 2.1 compatible with some CSS 3.0 functions (but not flexboxes) which can be external files. It is compatible with external fonts and includes most syntaxes written in HTML 4.0.
Time to make a choice
When it was time for the choice of the PDF library, the preference was given to domPDF. There are many reasons for this, but here are some of them. FPDF was not able to convert natively from HTML to PDF. It remains a reliable product for other projects. mPDF is complicated to install and requires the use of “Composer”, a tool that the host of my site refused to run. TCPDF is certainly the most advanced library, but not supported anymore. Waiting for the future version of “tc-lib-pdf”. Moreover, the code to provide is relatively complex to assimilate. Out of the four products tested, domPDF remained, which seemed, despite some weaknesses, to correspond the most to the needs of this site.
There are of course others, such as wkhtmltopdf, which requires the installation of an executable on the server. This is strictly forbidden by most hosting companies. And this list doesn’t take into account all the paid products, most of which are HTML 5.0 and CSS 3.0 compliant, which makes them fully compatible with Elementor. It would be really great to see one day a library like DomPDF integrating CSS 3.0. To be continued…
Installation of DomPDF (version 0.85)
As stated above, the choice was made for the DomPDF library. To install it, it is of course necessary to prepare the ground and use a child theme, often quoted in this blog. Below is a list of the different steps to perform.
- Download the library on GitHub or by clicking on the link at the top of this post
- Open the ZIP file and copy the folder “dompdf” to the root of the child theme
And that’s it, simple, right ?
Local fonts and CSS style sheets
To extend the possibilities of DomPDF, it is recommended to create two new CSS files :
- Custom_Fonts.css
- DomPDF_Styles.css
It is not necessary to put the style sheet for domPDF in the queue, but it is advisable to do so for the fonts, in case they are used elsewhere than in domPDF.
As a reminder, insert the code below to queue a CSS file.
// Enqueue Custom CSS Fonts
function Custom_Fonts() {
  wp_enqueue_style('Custom_Fonts', get_stylesheet_directory_uri() . '/css/Custom_Fonts.css', false, '1.0.0');
}
add_action('wp_enqueue_scripts', 'Custom_Fonts');
First PDF file
All that remains is to complete the PHP template to create the first PDF.
Add a reference to the fonts and stylesheet files.
// Load Fonts & Styles
$fonts = $dir . '/css/Custom_Fonts.css';
$css = $dir . '/css/DomPDF_Styles.css';
Add a reference to indicate where the file “autoload.inc.php” is located.
// Load domPDF library
$dir = get_stylesheet_directory();
require_once ( $dir . '/dompdf/autoload.inc.php');
Get the publication in a “$post” variable. Here is a trick to do it from the URL with the WordPress function “get_posts”.
// Get current URL
global $wp;
$current_url = home_url(htmlspecialchars($wp->request));

// Get post from slug
$args = array(
  'name'   => substr(strrchr($current_url, "/"),1),
  'post_type'   => 'it',
  'post_status' => 'publish',
  'numberposts' => 1
);
$post = get_posts($args)[0];
Get the permalink, author, title and content.
// Permalink
$permalink = get_permalink($post);

// The author
$authorID = $post->post_author;
$authorName = get_the_author_meta('display_name', $authorID);

// Get title & content
$title = $post->post_title;
$content = apply_filters('the_content', $post->post_content);
Write the HTML code that will be converted to PDF. The code below is an example that will display the title, author and content of the publication.
Enclose all HTML code in a “$html” variable.
Note here that two classes, “author” and “content” have been used to allow to modify these elements.
// HTML
$html = '
<!DOCTYPE html>
<html>
  <head>
    <meta charset="utf-8" />
    <link rel="stylesheet" media="screen" type="text/css" title="CSS" href="' . $css . '"/>
    <link rel="stylesheet" media="screen" type="text/css" title="CSS" href="' . $fonts . '"/>
    <title>' . $title . '</title>
  </head>

  <body>
    <div>
      <!-- Title -->
      <h1>' . $title . '</h1>
      <div class="author">' . 'By' . ' ' . $authorName . '</div>

      <!--Content -->
      <div class="content">' . $content . '</div>
    </div>
  </body>
</html>
';
Last step, reference and instantiate a new PDF document, then :
- Pass the HTML code.
- Choose the orientation of the paper.
- Use the “isHtml5ParserEnabled” parser, which will simplify the code and especially make it readable.
- Activate the remote plug-in with “isRemoteEnabled”, to allow the download of external files like fonts, CSS or even images.
- Choose a resolution in DPI. Here, the PDF will be displayed in 98dpi, which corresponds to a page of 810 x 1146 pixels.
- Finally, display the content on the screen with the “render” and “stream” functions. Here the title of the publication is used as a title for the PDF document and will be displayed directly in the browser.
// Reference the Dompdf namespace
  use Dompdf\Dompdf;

  // Instantiate and use the DomPDF class
  $document = new Dompdf();
  $document->loadHtml($html);

  // Setup the paper size and orientation
  $document->setPaper('A4', 'portrait');

  // Options
  $document->set_option('isHtml5ParserEnabled', true);
  $document->set_option('isRemoteEnabled', true);
  $document->set_option('dpi', '98');

  // Render the HTML as PDF
  $document->render();

  // Preview the generated PDF to Browser
  $document->stream($title . ".pdf", array("Attachment"=>0));
Below, the complete code of the model.
<?php
  /**
  * The template name: IT PDF
  * Description: IT PDF Template
  * Author: Olivier Paudex
  * Author Web Site: https://www.fuyens.ch
  */

  if ( ! defined( 'ABSPATH' ) ) {
	  exit; // Exit if accessed directly.
  }

  // Load Fonts & Styles
  $fonts = $dir . '/css/Custom_Fonts.css';
  $css = $dir . '/css/DomPDF_Styles.css';

  // Load domPDF library
  $dir = get_stylesheet_directory();
  require_once ( $dir . '/dompdf/autoload.inc.php');

  // Get current URL
  global $wp;
  $current_url = home_url(htmlspecialchars($wp->request));

  // Get post from slug
  $args = array(
    'name'   => substr(strrchr($current_url, "/"),1),
    'post_type'   => 'it',
    'post_status' => 'publish',
    'numberposts' => 1
  );
  $post = get_posts($args)[0];

  // Permalink
  $permalink = get_permalink($post);

  // The author
  $authorID = $post->post_author;
  $authorName = get_the_author_meta('display_name', $authorID);

  // Get title & content
  $title = $post->post_title;
  $content = apply_filters('the_content', $post->post_content);

  // HTML
  $html = '
  <!DOCTYPE html>
  <html>
    <head>
      <meta charset="utf-8" />
      <link rel="stylesheet" media="screen" type="text/css" title="CSS" href="' . $css . '"/>
      <link rel="stylesheet" media="screen" type="text/css" title="CSS" href="' . $fonts . '"/>
      <title>' . $title . '</title>
    </head>

    <body>
      <div>
        <!-- Title -->
        <h1>' . $title . '</h1>
        <div class="author">' . 'By' . ' ' . $authorName . '</div>

        <!--Content -->
        <div class="content">' . $content . '</div>
      </div>
    </body>
  </html>
  ';

  /************************************************************************************************************************************/

  // Reference the Dompdf namespace
  use Dompdf\Dompdf;

  // Instantiate and use the DomPDF class
  $document = new Dompdf();
  $document->loadHtml($html);

  // Setup the paper size and orientation
  $document->setPaper('A4', 'portrait');

  // Options
  $document->set_option('isHtml5ParserEnabled', true);
  $document->set_option('isRemoteEnabled', true);
  $document->set_option('dpi', '98');

  // Render the HTML as PDF
  $document->render();

  // Preview the generated PDF to Browser
  $document->stream($title . ".pdf", array("Attachment"=>0));
?>
The CSS stylesheet
As mentioned above, it is possible to format the PDF with CSS.
Add the code below to the “DomPDF_Styles.css” file. It will format the HTML tag “H1” and the classes “author” and “content”.
/* Heading */
h1 {
  font-family: "Open Sans", Sans-Serif;
  font-size: 35px;
  font-weight: 800;
  letter-spacing: -1.5px;
  text-align: center;
  color: #333333;
  line-height: 1.3em;
  margin: -10px 0px 20px 0px;
}

/* Content */
.content {
  font-family: "Open Sans", Sans-Serif;
  font-weight: 400;
  font-size: 15px;
  letter-spacing: -0.5px;
  line-height: 1em;
  margin: -10px 0px 20px 0px;
}

/* Author */
.author {
  font-family: "Open Sans", Sans-Serif;
  font-weight: 300;
  font-style: italic;
  font-size: 15px;
  letter-spacing: -0.5px;
  line-height: 1em;
}
Local fonts
As far as fonts are concerned, you can choose to load them directly from the website or from CDN (Content Delivery Network). The example below shows the local version.
It is important to know that for each font that comes in bold, italic, etc…, you need a different file. You can find all the files on Google Fonts.
Add the code below to the “Custom_Fonts.css” file. It will apply the chosen font to the text using the CSS method “font-family”.
/* Open Sans */
@font-face {
  font-family: "Open Sans";
  src:  url('/wp-content/themes/hello-theme-child-master/fonts/opensans/OpenSans-Regular.ttf') format('truetype');
  font-weight: 400;
}

@font-face {
  font-family: "Open Sans";
  src: url('/wp-content/themes/hello-theme-child-master/fonts/opensans/OpenSans-LightItalic.ttf') format('truetype');
  font-weight: 300;
  font-style: italic;
}
The caching process
Providing visitors with pre-loaded or cached pages makes the site much faster and installing a caching plugin is a natural step to take on WordPress. This site does not make exception to the rule and uses the plugin Wp-Optimize.
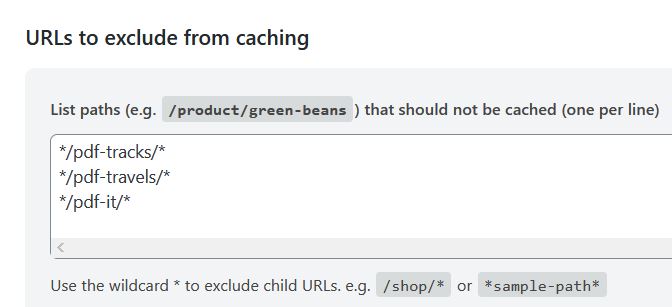
Creating PDF pages means however a limitation to preloading the pages. As these are created on the fly from the HTML code of the page, they cannot be cached. They must therefore be excluded.
With Wp-Optimize, this is done in the advanced tab. Here you can exclude URLs that should not be taken into account.

The final word
The chapter on printing PDFs was a big challenge to create printable PDFs on one hand, but especially to be able to make the content dynamic using WordPress. With all these aspects in mind, the above examples are still reusable in all cases. This gives a good starting point on how to print a publication created with WordPress and Elementor, which was the goal.


